Showing posts with label techniques. Show all posts

Monday, February 17, 2014

Recipe Free Cooking: Easy Vegetarian Curry

This will all be food soon.

People ask me all the time where I get my recipes for the blog. I think some of them think I'm cooking my way through a book, similar to the Julie/Julia project everyone saw in that stupid movie. And while I do frequently consult recipe books and cooking blogs for inspiration, I'm just as likely to walk into the kitchen, quickly scan the fridge and then start making something. I learned how to cook pretty young, so I'm very comfortable in the kitchen. My mom taught me to cook dinner with her, and I saw her modifying and adapting recipes on the fly to suit our family's tastes and so I picked up the idea that a recipe is just a guideline. 

Recipe free cooking makes you so much more flexible and versatile in the kitchen. Once you are familiar with your ingredients and confident in your skills, you will be doing it all the time. Instead of just knowing a few recipes, you know a couple of methods for creating a meal. And that's what makes a good cook. You'll get there with practice. 

There's a couple things that really lend themselves to recipe free, improvisational cooking. Soups, curries, and stir fries are my go to meals when I have a hodge poge of ingredients and desperate need to eat dinner. They all incorporate large amounts of healthy vegetables and are easy to prepare. They are flexible enough to include anything you've got on hand, and rely on easy to store pantry staples, like chicken broth, canned beans and brown rice. 

Check out the picture. All the things in this picture will combine together to make a delicious vegetarian meal. It's easy. I heat up a little oil in my pan, brown some onion, garlic and ginger if I've got it. No worries if I don't. Then I add a generous spoonful of curry powder. I don't measure. Stir everything around to make a paste, then add the peeled, chopped carrots, cauliflower, mushrooms and kale. Add a big pinch of kosher salt. Stir some more and add a can of rinsed and drained chickpeas, and a can of tomatoes if you've got it. If you don't, no one will die. Add the coconut milk, turn the heat down and let the whole thing simmer on low until the vegetables are tender. Serve over brown rice and enjoy. 

What else can you add? Broccoli is good. So are potatoes or kohlrabi. Any kind of winter green works.  Green beans are probably okay. Just throw something in! If you need meat to be happy, throw some leftover roast chicken or pork in at the end.  Skip the chickpeas if you don't like them, or swap out another bean. Use chicken or vegetable broth instead of the coconut milk. Use tomato sauce instead of the canned tomatoes. Pour it over quinoa instead of rice. Really, I don't care. You won't hurt my feelings any. Make yourself  happy. Improvise. Experiment. Enjoy. 

Like my poorly lit iPhone pictures? I'm on Flickr now! And you can like me on Facebook

Thursday, February 13, 2014

Ribeye Steak and Bourbon Mushroom Sauce

Eat this.
I promised to post this a few weeks ago and I'm finally getting to it now. Yeah, that'll teach me to attempt any kind of schedule around here. Luckily, you all have low expectations for me anyway.

So! Let me introduce you to Exhibit A in the "Why I Will Never Be A Vegetarian" debate. Delicious steak with bourbon mushroom sauce. Mmm. My mouth waters just thinking of it. Mr. Northside and I both love steak. We used to go out for it, but then I perfected my home cooking technique. I can make a good ribeye from the grocery store taste like something from an upscale chain. Why would I go out for steak, wait forty five minutes for a table, and spend twice as much for something I can make myself? Especially with Valentine's Day coming up. Everyone goes out for Valentine's and everyone eats those silly, overpriced prix fixe meals. Save money and aggravation by making your own meal at home and watch Netflix in your jammies.

We've been making steak at home for years and have perfected the technique. It's very simple. You pan sear a good ribeye as hot as you can get it, then finish it in the oven. While it's resting on the counter, you use the already hot pan, full of delicious brown bits to make a bourbon mushroom sauce you pour over the steak. It takes minutes to prepare and I promise, it's just as good as waiting in line for an hour on a special occasion. Plus, you get to be creative with sides. Why waste your time with steamed broccoli when you can have roasted? Forget mashed potatoes, have some cauliflower puree. You'll be happy you decided to stay in tonight.

Why bourbon? Because I like it, that's why. Bourbon pairs really well with steak and the mushrooms soak up the flavors. Plus, I can't think of a single place around here that serves something like this. I guess you can go to TGI Friday's and get something with that syrupy sweet Jack Daniels sauce dumped on it, but why? This is better. Much better. I recommend using a good quality bourbon, one you'd be happy drinking neat. My favorite right now is Four Roses small batch, but really, any good bourbon will work.

You know you want this.
Ribeye Steaks with Bourbon Mushroom Sauce

2 ribeye steaks, salted and brought up to room temperature
1 tablespoon canola oil
2 tablespoons butter
1/2 cup fresh, sliced mushrooms (I like crimini, but use your favorite)
2 tablespoons bourbon

Pre heat broiler. Pre heat pan. When a drop of water skitters across it, add canola oil and swirl to coat. Place steaks salt side down in the pan, salt the other side and wait. You are waiting for the side touching the pan to finish cooking. You can tell it's done when you can easily flip it over with a pair of tongs. After you flip the steaks, throw the whole pan in the oven until steak reaches desired doneness. I'm a fan of the finger poke test. When steaks are ready, move them out of the pan and cover. While they are resting, the mushrooms will cook. Put the pan back on the stove and turn your burner to medium. Drop your butter in the pan, let it melt. Add your sliced mushrooms and let them brown, while also scraping up the delicious brown bits. Add the bourbon and let it cook off, about one minute. Pour over steaks. Ta dah! Now you have the
best special occasion meal you and your sweetie can have on Valentine's Day.

Like my poorly lit iPhone pictures? I'm on Flickr now! And you can like me on Facebook!

Monday, February 3, 2014

Easy Tofu and Broccoli Stir Fry

Chinese New Year started on Friday, and I married into a Chinese family, so of course we are having fun eating our traditional foods like noodles for long life and a whole fish for prosperity. Even if you aren't celebrating Chinese New Year, stir fries are a great way to eat more vegetables. You can stir fry almost any vegetable and lean protein together. I have a beautifully seasoned wok now, but for years I made my stir fries in a regular skillet. As long as you can cook quickly, over high heat, you can make delicious stir fries at home. The great thing about stir fries is that they are endlessly customizable. You can do any combination of veggies and protein. 

The trick to a good stir fry is to cook everything very fast. You need to chop everything in small, even pieces, get your pan extremely hot and just keep it moving. Stir fries are the only thing where I make sure all my vegetables are chopped before I turn on the stove, Usually, I chop as I go. If you try that while stir frying, something will burn. So make it easy on yourself and chop everything first. You can even cook your rice before getting started. It's one less thing to worry about.

For a tough, woody vegetable like broccoli, it needs more than just touching the wok to cook through. I always give it a quick stir fry to brown it, then blanch it very quickly in the wok before cooking anything else. The tofu needs some prep work too. It needs to be pressed and drained before cooking and I like to give it a swirl of soy sauce and sesame oil before cooking.


Tofu and Broccoli Stir Fry

2 crowns brocoli, separated into florets
2 carrots, peeled and thinly sliced
1 small onion, cut into strips
1 block tofu, rinsed, drained and cubed (I like to marinade mine with one tablespoon soy sauce and one teaspoon sesame seed oil. It adds flavor to the tofu and it keeps it from sticking.)
1/2 teaspoon of ginger, minced
2 cloves garlic, minced
1 tablespoon soy sauce
1 teaspoon cornstarch

Get your skillet or wok extremely hot. I test mine by flicking drops of water at it. If it sizzles immediately, its good. Give it a good glug of canola oil, or something else that can take the heat and swirl pan to ensure coverage. Add broccoli to pan and move it around to keep it from burning. Add about a quarter cup of water, then cover with a tight fitting lid. Let broccoli cook until bright green and tender, about three minutes. Remove immediately and rinse out wok. Heat it back up, add more oil.
Add carrots and onion, stir it around for about a minute. Add tofu, continue to stir. Add minced garlic and ginger, then add broccoli back to the wok. Stir it again. Combine cornstarch with enough water to make a slurry, plus the leftover soy sauce. Add to wok, stir to make sure vegetables and tofu are covered. Serve immediately.

Like my poorly lit iPhone pictures? I'm on Flickr now! And you can like me on Facebook

Wednesday, January 22, 2014

Low Carb Cauliflower Puree

Cauliflower puree topped with
 steak & mushrooms
There are two schools of thought on cauliflower puree, the popular, low carb substitute for mashed potatoes. The first is to pretend your cauliflower really is mashed potatoes and drown it with butter and cream. The second is to man up, admit you are eating a vegetable, and prepare your cauliflower simply and lightly with just a little vegetable broth. I've done it both ways and yes, I prefer the second version. Cauliflower has a natural sweetness to it and it doesn't need much embellishment to be delicious. Besides, the idea of cauliflower puree is to eat healthy. It's silly to load it up with lots of saturated fats when you've got something so good for you. It soaks up your gravy or pan sauce just as well without the extras. I don't miss mashed potatoes when I make this at all.

I cook my cauliflower in vegetable broth to add extra flavor. You could use chicken if you prefer, or just plan salted water. I like to do my puree in my food processor, but I think a blender would work too.  I've tried mashing it with a fork, which works okay, but you aren't going to get a really smooth puree. It'll be mashed cauliflower chunks. I usually make this when I know I'll have a gravy or sauce to go with it, so I leave it plain. But if you want to experiment, I think roasted garlic, a handful of grated parmesan cheese or chopped fresh herbs would be amazing.

Cauliflower Puree 

1 head cauliflower, chopped (You can include the stems, along with the flowerettes.)
Enough vegetable broth to cover your cauliflower (About three cups)
Salt to taste


Chop cauliflower into smallish pieces. The smaller the pieces, the faster they will cook and the easier it will be to fit them in your food processor. But don't make yourself crazy over this step. Bring your broth to a simmer and add the cauliflower. Simmer until it's soft enough to break apart with a fork. With a slotted spoon, remove cauliflower and add to food processor. Pulse until it reaches your desired level of smoothness. I like mine with a few chunks still in it. If needed, use the remaining broth to thin out your puree. Sometimes it needs a little extra to get things moving. Serve immediately.  

Next up, I'm going to share how I did that steak with bourbon mushroom pan sauce.

Like my poorly lit iPhone pictures? I'm on Flickr now! And you can like me on Facebook!

Thursday, February 3, 2011

Gluten Free Applesauce Oatmeal Muffins

For me, "gluten free" always conjures up visions on neurotic suburban housewives knocking cupcakes out their kids' hands in a panic. "Not gluten!" they gasp. Which is unfair of me, because I know that many people have a real sensitivity to gluten. I just think there are many people who don't actually understand food and just hop on the latest nutritional fad.

 The other things I think of when I think of "gluten free" is "taste free" and "weird, complicated ingredients". Fortunately, these muffins feature neither. The weirdest thing is oat flour, which is obtained by simply pulsing a few cups of oatmeal in the food processor until fine. Oatmeal is easy! And the flavor on these is amazing. they have a nutty texture, a rich mouthfeel from the yogurt and big apple flavor. You can substitute a cup of any fruit puree for the applesauce and still have a delicious muffin. The original recipe from Cheap Healthy Good that I've tweaked used mashed bananas and I've done it with pumpkin as well. Just make sure it's a full cup, otherwise your muffin will be bland.

The only downside of these muffins is that they are not very pretty. The lack of gluten means they don't rise very well, so you end up with something about the size and shape of a hockey puck, but made of oats and delicious. Never you mind that! Just enjoy your tasty muffin and share it happily with gluten sensitive friends.

1 1/4 cup rolled oats
1/2 cup yogurt
1/2 cup milk
1 1/2 cups oat flour (This can be made by putting two cups of rolled oats in your food processor and pulsing it until fine)
1/2 teaspoon cinnamon
1/2 teaspoon nutmeg
1/2 teaspoon salt
2 teaspoon baking powder
1 teaspoon baking soda
1/2 cup brown sugar, lightly packed
1/3 cup vegetable oil
1 cup applesauce (or other pureed fruit)

Preheat oven to 400 degrees. Grind oats to make flour. Combine with rolled oats, yogurt and milk. Allow to hydrate for a few minutes. (This step is important! If the oats don't hydrate, they won't cook and it'll be gross. This is usually when I find and measure my other ingredients. ) Combine spices, baking powder, baking soda, sugar, oil and applesauce with the oats. Measure into well greased muffin cups. Bake for about twenty minutes or until a knife point inserted in the center of a muffin comes out clean. Serve and enjoy.

Sunday, October 4, 2009

The Mexican Aisle

From blog


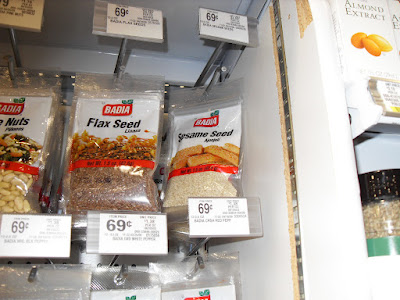
Recently, I've started to become acquainted with the section of my Publix that houses the Hispanic ingredients. The bit that I particularly like right now is the selection of Hispanic spices. They come packaged in clear plastic baggies, which isn't the greatest thing in the world for freshness, but if you only need a couple tablespoons of something, it can be just what you're looking for. The variety is pretty good, and many of them come whole, like star anise, cinnamon sticks and nutmeg. I bought a little bag of pine nuts to make Lebanese stuffed eggplant this week. I only need a few tablespoons for the recipe. Why waste the money on a bottle?

And check out the difference on prices:

From blog


These are the sesame seeds I bought to top an Asian coleslaw a few months ago.

From blog


And these are the ones I didn't buy. Holy cow. What a difference. And sure, you get more with the bottle. But how often do I use sesame seeds? They'd go to waste. And I don't have to traipsing all over town to find a place that sells high quality spices. It's amazing what you can find in your neighborhood grocery store these days.

Saturday, June 27, 2009

Shopping the Farmers Markets

I have a friend, who is interested in shopping the farmer's markets this year. So we took him with us on our weekly prowl, and I thought I'd post some of my strategies here as well. There was also great article in the Chicago Tribune that I found recently, that has some great ideas too.

From blog


First, get there early. Remember in "Ratatouille" when Collette is yelling about the first pick of the day? This is how you get it. It's not like Publix where they've got another hundred cases in the back, once they run out, they run out. At the Riverside market in Roswell, I've only managed to buy fresh eggs once, because he's always out by the time I make it there. Last year, I missed out on Georgia blueberries several times because I couldn't get there fast enough. I like to walk through the market once, before buying anything, looking for the best deals and at what's in today.

From blog


Next, bring bags. Most of the vendors will have thin plastic bags. Some of them are reused bags, some are new. However, it lowers their costs if you provide your own packaging. So I bring my own cloth bags. Also, you want to bring cash. none of the vendors in Roswell or Alpharetta are set up to take debit cards. We usually bring $40 and we spend it all. And you'll make them very happy if you can bring some fives or some singles.

From blog


Don't be afraid to ask what something is, or how to prepare it. I've learned alot of new ways to prepare vegetables since e started going to the markets. I as an infrequent consumer of collards, for example, and beets never made it into my bag. I only knew to simmer collards with onion and ham. And god knows what you did with a beet. Now I know a couple different ways to prepare both of these, because I asked.

Also, you'll want to spend some time prepping your veggies when you get home. We're all used to the convenience of pre-washed and chopped bag o' salad at the grocery store. You have to make this yourself. So right now I have a colander of sorrel rinsed and draining in my sink. Later on, I'll put it in a container, or bag and store it in the fridge, ready to throw in a salad or stir fry. It also helps them fit in the fridge a bit better. I always have trouble with that. Everything will last longer than you'd think. Its fresh from the ground, instead of being hauled across the country on a truck for a week, or flown in from South America. But if you don't get it into a form you'll use, then it doesn't matter how fresh it is.

From blog


You really have to embrace vegetables if you're going to shop at the Farmers Market. They become the star of the show, rather than the accompaniment. We're eating alot of salads and veggie stir fries right now, and grilling squash and peppers outdoors.

If you want an idea of when certain things will be available, you can always ask the vendors, or you can check out this very handy interactive map by Epicurious that will give you an idea of what's available this month. It also includes links to recipes, which can be very helpful when dealing with a glut of unfamilar veggies.

From blog


The Riverside Farmers
Market in Roswell will be closed next weekend for the holiday. However, the Alpharetta Farmers Market will be open for business.

Tuesday, June 16, 2009

I'll never hear the end of this now...

I made yogurt.

From blog


It's a PERFECTLY reasonable thing to do. I swear.

See, I had almost an entire gallon of milk that, for some reason, we hadn't finished before the sell by date. And even though I know that it's still good for a few days after that, it doesn't taste as fresh to me and I don't like to drink it straight. I'll use it to cook with though. But I had almost a full gallon this time. There was no way I could cook with all of it before it really went bad, so I decided that it was time I made yogurt.

I've been dithering over making yogurt for months now. My co workers make fun of me for talking about it all the time, but not doing it. So I decided to suck it up and go for broke. The milk was already wasted, why not experiment? So I made yogurt.

Unfortunately, I didn't take pictures of the process, since I didn't think it would really work. I'll take pictures next time, I promise.

The recipe I used comes from "A Year of Crockpotting", which is a really simple and easy recipe. Others I've read call for turning on the oven, or putting heating pads in a cooler or other silly things. I just heated the milk in the crockpot, added some store bought Stoneyfield Farms plain whole milk yogurt as a starter and let it do its thing.

Mine made a CRAZY amount of whey and it was very grainy. So I strained it using coffee filters and ended up with something similar in consistency to ricotta cheese, but very tangy. I like it. It's different, but I like it. I ended up with about three cups of whey, which I added to bread dough in place of water.

Sooo...I guess I'm a hippy now.

Wednesday, June 10, 2009

Mmm....we're having ramen!

So my husband seems to come down with some kind of cross between swine flu and SARS this week. I dunno, I'm not good with dieseases. All I know, is that he's more pathetic and useless than he usually is. So when he got home from work today, and immediately took a two hour nap, I decided to make him one of his favorite foods: Ramen.

Ramen is one of the few highly processed foods that I still bring home. I figure we all need a few vices and ramen isn't that terrible in the grand scheme of things. Yes, sodium wise, it'll kill you if you eat it every day. But as an occasional thing? Not so bad. Also, most of the sodium is the mysterious foil flavor packet, so if you're really worried (and if you are, why are you eating ramen?) you can always adjust.

As terrifying as it sounds, I've actually gone to resturants and ordered ramen. Everyone always looks at me like I've gone insane when I mention this. I mean, sure, I don't think ramen is considered gourmet food even in Japan, but Asian street food is kind of awesome. There used to be a great noodle house on Buford Highway where you could get a giant bowl of freshly made ramen and a side of crispy bottomed goyza for hella cheap. I used to make my husband take me there on dates, back when we were first dating. I've always been a cheap date.

From Northside Food


Anyways, I made ramen for dinner tonight. It's very easy and it always goes over well. I added sliced, hard boiled egg to mine, along with some sauteed turnip greens. I always add veggies to mine, either from a bag in the freezer, leftovers from last night's dinner, or fresh ones I've chopped small. Fresh baby spinach leaves are great stirred into a bowl. So is asparagus, chopped small. I also like to add protein, either in the form of a chopped egg or left over roasted meat. When I was a kid, I used to add chopped up deli meat. I suppose I could still do that, but why?

Adding the additional veggies and protein makes it a bit more of a complete meal and spreads the crazy hit of sodium out a bit. It's still not the healthiest thing I could be eating, but it's sure better than frozen pizza.

Tuesday, June 9, 2009

You're Doing It All Wrong

Recently, I've fallen in love with the video section at Chow. They've got a variety of video clips demonstrating how to wash strawberries, pour champagne, cook oatmeal, etc. All professionally produced and hosted by real chefs. Some of their tips are a little too "gourmand" for my tastes (the burger video in particular is too fussy for me), but most give great suggestions and I get inspired watching them. Which I think is the point. They want us to get out and cook.


I've chosen to link you to their bit on properly saucing pasta. I love this. I grew up in house with a sister who hates tomato sauce, so we always served it on the side. I hated how I never could seem to put enough sauce on my pasta to get rid of that gummy pasta taste. I started mixing them together in the pan when I started cooking for myself, mainly to save on getting the colander dirty. (My husband is convinced I destroy kitchens on purpose when I cook.) But the resulting pasta tasted much better, so I kept doing it. I haven't tried adding the butter and olive oil. It looks delicious, but I don't know if I can afford the extra fat and calories in my diet at this point. Oh well.

Enjoy the videos.

Wednesday, May 20, 2009

Doing more with less

We're trying to cut our budget right now to increase our savings. We don't have what I'd consider an extravagant lifestyle. Our only car is a paid for, beat to hell pick up truck, for example. So we've been looking for creative ways to live more frugally, without making us feel deprived of something we enjoy.

One of the blogs I've become a fan of recently, is Cheap Healthy Good, which is, as it says, about cooking that combines all three elements. A few month's ago, they had a great post about roasting one chicken and using the leftover meat for the rest of the week. I'm a fan of that approach. I've done this before with chickens and turkeys, and even hams. This week, I used a pork roast. Here's the menu for the week:

Sunday:
Dinner- Roasted pork with fingerling potatoes and a salad.

Monday:
Lunch- Left over pork, potatoes and salad
Dinner- Veggie lo mein, with chopped, leftover pork added

Tuesday:
Lunch- Left over lo mein (my husband), salad of romaine lettuce, carrots, broccoli, cucumbers and chopped roast pork (me)
Dinner- I had a banquet to attend for work, so the husband was on his own. He had more left over noodles.

Wednesday:
Lunch- Salads for both of us, witch chopped roast pork.
Dinner- Loaded baked potatoes, using roast pork as the protein.

So, not nearly as inventive or nutritional as CHG, but not a bad way to use up eight dollars worth of meat. I shall continue playing with this concept.

Sunday, December 28, 2008

It's time to make the donuts...

Breakfast this weekend was homemade beignets, made using the brioche recipe from my Artisan Bread in Five Minutes book.

From blog


These are the ones I made yesterday. Pretty, aren't they? And yeah, they really do only take a few minutes. The dough was already in the fridge, because I made cinnamon rolls for Christmas morning. Roll it out, cut it into squares, let it rest while the oil heats up. I don't deep fry things often, but when I do, I make sure to drain things properly. A cookie sheet, layered with paper towels, the topped with a wire cooling rack. It keeps the food from reabsorbing the grease from the paper towels while it cools. Then just sprinkle with powdered sugar while they are still warm and serve.

I had to finish off the dough today, so we made a very large batch. If they last until tomorrow, my husband will take them to work to share with his office. He will be the most popular actuary ever.

Tuesday, December 23, 2008

The Emotional Rollercoster of Candy Making


For years, I have coveted the "homemade" marshmallows peddled each Christmas in the Williams-Sonoma catalog. But 12 dollars for 15 marshmallows? I'm sure they'd be the best marshmallows ever, but I'm too cheap to buy them. So I've been wanting for years to make my own, just to see what the difference between homemade and Mr. Staypuff is.

I finally broke down this week and made some.

To your left, you see three packets of plain, unflavored gelatine "blooming" in my stand mixer bowl. I have no idea what that means, as a quick Google search tells me gelatin bloom is a way of measuring strength. I am not measuring anything here, just soaking it in cold water. In this recipe, the gelatin will provide the structure and stability my marshmallows will need to hold their shape and not be a sticky, sugary mess.

That was the idea anyways.

In a heavy sauce pan, I started heating a mixture of sugar, water, salt and honey. Why honey? Because I forgot to buy corn syrup. It does change the flavor of the mix, I'm not sure if it changed how it behaved. I'm still doing my reading on this one.

This was heated on low heat, until the sugar was dissolved. Basically, you are using the heat to create a super saturated sugar soltion. We all remember that from high school chemistry, right?

This was by FAR the most annoying, and time consuming part of the recipe. My Joy of Cooking lead me to believe it would take about 20 minutes to take this from you see here, to boiling. No dice. It took a little over an hour. And of course, it boils when I'm not looking, so it boiled over and made a sticky, sugar mess on my stove. At this point, I began to swear off marshmallows in all theur forms and curse them as the devil's confection.

Eventually, I got it to boil, and then to something approximating the "firm ball stage". If you have not made candy before, then you have no idea what that is. I'm still not exactly sure what it is. However, I do know that sugar molecules rearrange themselves in strange, and wonderful ways as you heat them. Sugar will have different properties, depending on what temperture it has been heated to. At 244 degrees, a sugar syrup like mine, should form a firm ball when dropped in cold water, that flattens when you press it. This isn't the most precise method of determing tempurature, but it seems to work okay. If I get seriously into candy making (which I just might), I'll invest in a candy thermometer to get accurate readings.

This is, by the way, the point at which I swore to never make another marshmallow again. I wasn't sure if I had judged my temperature correctly, but I was terrified of over cooking due to understated warnings of "toughness" in my cookbook if I allowed my sugar to over heat. Candy making is not for the faint of heart.

The sugar mix then gets dumped into my stand mixer and beat for 15 minutes. Yes, fifteen minutes. It gave me time to scrape the burned sugar off my stove, I guess. At this point, you are incoroparating air into your mix. Marshmallows are mostly air. I've seen some recipes that omit the gelatin and use egg whites to hold the trapped air bubbles in place. But I have as much luck with getting egg whites to stand up, as I do with not letting the stove boil over, so I steered clear of those.

One of the best tips, I ever learned from Alton Brown's shows, was to always consider your food's "final destination" when cooking, and get it ready before you need it. It saves you the "ZOMG! Where do I put this? What do I do?" freak out dance that I'm sure my family can tell you about from my days cooking at home. So after I cleaned my stove, but before I was done whipping air into my marshmallows, I got this ready. I took out my largest Corningware, lightly greased it with butter, then dusted the whole thing with powdered sugar. This will keep your marshmallow from sticking--a critical component.
See how white and fluffy it is now? At this point I allowed myself to feel a tiny spark of hope. Hope that I haven't made a giant sticky mess of my kitchen for nothing. Hope that I can make a decent marshmallow at home.

And now you see it in it's finished state. It's traquility belies how messy it was trying to get this out of the bowl. This stuff is STICKY. It stick to the paddle, my hands, the bowl, the spoon, everything. The only thing it didn't stick to? The dish I'm trying to put it in. Stupid powdered sugar.

At this point, I made the mistake of licking the paddle before I put it in the sink. Oh. My. God. I honestly don't like marshmallows that much. They tend to taste very chemically to me. But this tastes fantastic. There's definitely a different flavor from the honey. It's sweet, without being over powering.

My marshmallows will need to "dry" for at least 12 hours before I cut them into cubes, roll them in more powdered sugar, then transfer them to a air tight container for storage. I plan to bring some of these to my parents' house for Christmas Eve. I know my brother, who's first complete sentance was "More mini-marshmallows, Mom!" will want to try them. I also have some vague thoughts about dipping a few in melted chocolate, then topping them with crushed candy canes to make a holiday candy. But honestly, that may be gilding the lily.

Will I make these again? Maybe. It was a huge pain in the neck. It took far longer than I thought it would, and made a big mess. The fluff alone is pretty darn tasty though. I may try again once I have a candy thermometer to help me through the scary parts.

Thursday, December 11, 2008

It crackles even as we speak.


This is my third loaf of bread this week. We, uh, really like it. According to the recipe, the longer the pre-made dough sits in the fridge, the more the flavor develops. When I pulled this out of the oven, I was immediately hit with a waft of fresh sourdough and the sound of the crust crackling. While I will never call any of the loaves I attempted this week bad, this one is undoubtedly the best.

I have mixed up a second batch of dough, this time using a few cups of whole wheat flavor. I've done so much baking recently, I've run out of regular all purpose.

I got in a discussion about making your own bread with a co worker this week. With the economic downturn, we're all feeling the pinch and finding places we can save money. He's interested in making bread at home to save on groceries, which is an area many of us have been hit by rising costs.

So let's break it down. That loaf of bread, which could easily cost five dollars at a store was made from:

3 cups water Water
6 cups Flour
Salt
1 1/2 packs Yeast


Yeast costs about $3 for three packets. My recipe uses 1 and 1/2.
A 5 pound bag of flour costs about $3 as well. That's about 19 cups.

Salt and water are so cheap that the price is negligible.

My ability to do the math is breaking down now, but that recipe made three loaves this week. And my house smells awesome. If that doesn't inspire you to try it, I don't know what will.

Monday, December 8, 2008

First bread!

As I mentioned yesterday, I got the cookbook Artisan Bread in Five Minutes a Day for my birthday. I'm playing with recipes. I apologize for the quality of the photos. My camera is giving me some sort of Blue Screen of Death, so I'm forced to use my phone.


Haven't tasted it yet, as it needs to cool first, but it sure was easy enough. Here is a picture of my dough, fresh from the fridge:

You can see the corner where I removed a bit to make tonight's dinner loaf.

Their instructions recommend letting it rise on a pizza peel, then transferring it to a baking stone inside a very hot oven for cooking. I have neither of those things, so I just let it rise on a cookie sheet, covered with my silicon baking mat. I do think I will invest in those bread baking tools if I find I like this process. (Psst. An unglazed terracotta tile and a large wooden cutting board will easily take the place of those high falutin' gadgets. And they cost considerably less. )


The finished product. The top was slashed with a serrated knife to help it expand during cooking. The crust isn't as pretty as I'd like, but I think that's because I didn't do one of the steps correctly. You're supposed to put an empty pan in the bottom of your oven while it heats. When the bread goes in, you add a cup of water to that pan and shut the door. The steam helps build that beautiful, glossy, crackling crust every one ooohs and ahhs over. I put the pan and water in at the same time and then kept opening the door to peek. So I don't think it got much steam action. Oh well. Next time.

Last night while poking around, I find a great video by the authors of the book. They are showing their method off on a TV morning show. It gives a pretty good idea of how it works.


Sunday, December 7, 2008

Bread and Soup

I'm coaching girls basketball this season. It's a testament to how great this country is, that someone like me, who barely knows anything about the sport (the ball goes in the hoop, right?) can become a coach. The girls are actually not that bad. We lost our first game last week, but I chalk that up to inexperience. They can only get better, right?

Anyways, with all the late hours I've been putting in at work recently, I haven't had as much time to cook as I normally do. Some of my meals have been downright pitiful (My lunch on Friday was peanut smeared on a bagel, and a handful of "baby" carrots.) since I haven't really made time to think of alternatives.

That changes this week. I'm making a giant (and I do mean GIANT) batch of curried lentil soup for dinner tomorrow. Hopefully, the leftovers will last for lunch and dinner for several days. To go with it, I'm making bread.

My birthday was last week. My parents gave me a copy of Artisan Bread in Five Minutes a Day, which is the hot cookbook tearing up all the foodie blogs this year. The premise is simple. Make a large amount of bread dough ahead of time, store it in the fridge for up to two weeks. Pull off a chunk and bake with it whenever you feel like it. They give you five or six (I didn't really count them) base doughs to work with, and directions on how to turn them into anything from rye, to challah, to focaccia. I made a batch of French "boule" dough this afternoon, that could potentially be pizza dough, french bread, or pita, depending on what I do with the dough. That's pretty cool.

Hopefully, I'll get a chance to blog a bit about how the bread turns out. It seems like a pretty easy system, and the storage in the fridge will bring out a nice, sourdough-ish flavor. The book's authors keep emphasizing how fool proof this recipe is. Indeed, there are a few places where I thought the directions were a bit vague, presumably because they didn't want to limit my inclination to do what feels natural.

And since I probably won't get a chance to blog about it later, here's my recipe for lentil soup.

1 ham bone, preferably with meat still on it.
2 pounds of lentils, sorted and rinsed
Carrots
Onions
Garlic
Curry powder

All of this will go in my giant Crockpot o' Doom with enough water to fill it two thirds full and will cook until I get home.

Roast Chicken

From blog


A few weeks ago, Publix had some incredibly good deals on chicken leg quarters. So naturally, we filled our freezer. I know some of you will recoil in horror at the thought of eating-gasp- DARK MEAT, but bear with me.

First off, because of the demand for breast meat, poultry legs of any kind are a great value. They are always priced lower than breasts. The legs have more flavor, more nutritional value, and are easier to cook. They don't dry out as easily as breast meat does.

I first started cooking with chicken thighs when we got married. I'd grown up in a white meat family. My husband, though, was a dark meat guy. At Thanksgiving, he quickly claimed both legs for himself and ignored the rest of the turkey. I was also working part time and going to school full time, so I was beginning my love affair with the Crockpot. I learned pretty fast that thighs stood up to braising better than breasts, and that it saved us money, and that if I made them, my husband would be happy. So over time, I have grown to appreciate dark meat and actually do prefer it now.

I love chicken quarters in particular because of the beautiful way they present. Really, what could be prettier on your plate than an elegantly bent leg, covered in a brown and crackling skin, and surrounded by rice or couscous to soak up the tasty pan drippings? Not a whole lot, right?

I managed to get a few pictures of some of the things I've done with all the leg quarters I've collected before my camera died. One of them is the pretty picture gracing the top of this post. It's roasted chicken on a bed of mixed potato wedges. It's a very simple thing to do. Cut the white and sweet potatoes into wedges, toss with your choice of seasoning, and olive oil. I also add big cloves of garlic and chunks of onion. Place the chicken quarters on top, rub with a little oil, then season. I used Green Street Grill Rub from the Alpharetta Spice Company on these. Roast them at 350 until done.

From blog


This one is my easy Coq au Vin recipe. Coq au Vin is another marvelous invention of the French peasants, created to make an old rooster past his prime into a tasty treat. My version doesn't rely quite so much on stewing, but is still rich and satisfying.

First, fry up some bacon bits. I do this by cutting my bacon into bits, then frying. Once they are brown, pull out the bits and drain them. Liberally salt and pepper your chicken legs. Place them skin side down in the pan, and let them brown. You aren't trying to cook them all the way through, just get the skin brown. After they reach satisfactory brownness, flip them over and brown the other side. Remove from pan. I put mine into a big casserole dish, which I intended to cook the final dish in.

Deglaze the pan with a decent quality red wine. I can't recall what I used here. Probably a Three Buck Chuck Pinot Noir, or Merlot. We tend to have that lying around. Add chopped carrots and onions. Use the veggies to scrap up the brown bits of bacon and chicken stuck to the bottom of the pan. You want those in your final product. After the veggies are softened, pour them over the chicken legs. Lid it up, and put it in the oven. Cook it on 350 until done.

I served this alongside some egg noodles, because those are awesome with the red wine sauce.

Friday, November 28, 2008

Homemade Bacon?

I frequent several forums, on a variety of topics. Some of the most interesting food conversations actually pop up on the non-food forums. This happened a few weeks ago on the forums at Cracked.com, when someone started a thread detailing how to make your own bacon. Yes, your own, home smoked bacon. I love making things from scratch that other people think only come out of a can, but I admit bacon never popped into my head as something to try. But after seeing this detailed tutorial, complete with pictures, I'm tempted to give it a shot.

So with the permission of the mysterious man known only as "The Iron Colonel", I bring you The Bacon Chronicles: Legend of the Homemade Bacon My comments in that thread are posted under the handle "Kathana" if you're looking for me. There's several other bloggers posting in that thread too, but since I'm unsure of whether or not they'd like their Cracked identities too closely linked to their blogs, I'll leave it alone.

I should also warn you. It's, uh, Cracked. It's a comedy site. Humor is subjective and occasionally offensive. They recently put up an article called "Five Astounding Advances in the Science of Getting Drunk". I only say this so none of you can come back to me later and complain that I forced you to read swears against your will.

Friday, November 7, 2008

Yes, people really eat those things down here...

I recall when I was growing up in Utah hearing about fried green tomatoes, and being horrified that someone would actually eat something like that. I dislike the mushy, slimy texture of cooked tomatoes, so the thought of eating a cooked tomato that's not even ripe yet? Disgusting. How can you eat something like that?

Very easily I've discovered.

I made my first attempt at fried green tomatoes about a week ago. I had tried them before at resturants, and while they weren't disgusting, neither were they something I wanted to seek out. However, I'm very committed right now to local, seasonal eating, and there is nothing that says "late October in Georgia" more than a plate of fried green tomatoes.

Green tomato anything is a great way to use up those late season tomatoes that just will not ripen now that it's cooler. I made these using the last tiny tomatoes from my yard and a few other things I'd been saving. This is a perfect example of poverty food.


First, I sliced my tomatoes and sprinkled them with salt and pepper. The salt will dry out the tomato, which makes the breading stick. Leave them on the counter for about ten minutes. Breading is very simple. The technique for a tomato is the same as a piece of meat. First, you roll in flour. I used unseasoned all purpose. Remember, the tomatoes are already seasoned. Then I dipped them in an egg and milk mixture. Then you roll them in bread crumbs. I ran a slice of home made beer bread through my food processor to get my bread crumbs. The flour gives the egg something to stick to, the egg gives the bread crumbs something to stick to. If you've ever bitten into something fried and had the crispy outside come away from the inside bit, they didn't use flour first.

While I was mucking about with the breading, I melted some saved bacon fat in a pan. Bacon fat is great. It's full of flavor and it comes free with your breakfast. After I finished breading, the tomatoes went in the pan.

From blog


Notice, I'm only cooking a few at a time. Crowding the pan means they take longer to cook and soak up more grease. I like bacon fat, but I like my arteries more.

From blog


As they reach doneness, pull them out and lay them on paper towels to drain. If you're super concerned about the grease, you can lay them on a cooling rack. Since I only had a few tomatoes, I wasn't too worried about them reabsorbing the grease.

And thus concludes the saga of my first attempt at growing my own tomatoes.

Submitted to Grow Your Own.

Wednesday, September 24, 2008

And now? Well, I'm just showing off.

I bought a pumpkin at the Riverside Farmers Market Saturday.

From blog


It's a white pumpkin. I had no idea such things existed. I thought it was a giant squash. But no, it is a pumpkin.

From blog


At this point, I become concerned that I have been tricked into purchasing a squash. I hate squash with an unholy passion. If I have purchased a giant squash, I will be annoyed.

From blog


My squashkin, cut up and placed in my brand new slow cooker. Scrap out the seeds, leave the peel on, cut into chunks. Easy.

From blog


The seeds, washed and ready to toast. Unfortunately, I didn't get pictures of the finished product from these. They are currently sitting in a container in my desk drawer at work for quick snacks. Mmm...snacks.

From blog


After the pumpkin was fork tender, I took it out of the slow cooker and let it cool in my fridge over night. Then I trimmed off the peel with a paring knife and put it in this big pot.

From blog


My pumpkin puree. I mashed it up with my wire whisk, and added salt and cinnamon to it. I did heat it up a bit, because I was worried about it being water logged. But I don't think it needed it.

From blog


Pumpkin puree, measured into zip bags and resting on the table to cool. I have an awesome ladle that holds exactly 1/2 cup, so it's easy to measure things like this for freezing. Most of the bags are one cup bags, but I do have a three cup bag. That one is for a pie.

From blog


This is a batter made with a bag of the puree. Oooh! What could it be?

From blog


Homemade pumpkin bread, with locally grown black walnuts. And it's the best pumpkin bread I've ever made. This is when I stop being suspicious that I bought a squash. Squash doesn't taste this good. And if it does, I don't want to know about it.

So was it worth it to make this with my own pumpkin? I'm going to say yes. It did take a considerable amount of time to process the pumpkin. However, most of that was done in the slow cooker, while I was hanging out with friends Saturday night. I think I spent maybe an hour and a half working on the puree itself, and most of that happened when I was trying to cut it apart. That sucker was tough. It made a TON of puree. I think I got at least eight cups out of it, and it was a smallish pumpkin. It was definitely cheaper than buying that much in a can, and it didn't come with a bunch of additives I didn't want either. So if you've got the time, go for it.

The recipe (Adapted from "The Joy of Cooking" 1975 ed.):

Preheat recipe to 350 degrees

Sift together:
1 3/4 sifted all purpose flour
1/4 tsp baking powder
1 tsp baking soda
1 tsp salt
1/2 tsp cinnamon

In a large bowl, beat together:
1 1/3 cups sugar
1/3 room temperature butter
2 eggs

Add: 1 cup or one small can pumpkin

Add: 1/3 cup milk

You can add nuts or raisins at this point too. Be careful to not over mix.

Pour into greased loaf pan and bake for one hour, or until a knife inserted in the middle comes out clean.